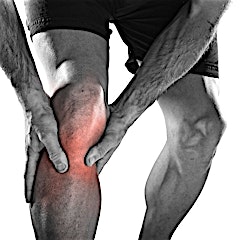
Get Your First Pull-Up in 30 Days – Just Follow This Guide

The guy does pull-ups to make progress in 30 days
Written by: Author
Edited by: Editor

When I was a beginner, I found pull-ups quite challenging, primarily because they required me to lift my entire body weight.

Many people think of pull-ups as tough exercises that only the fittest can achieve, but that’s not true.

There’s a practical way to gradually work up to doing your first pull-up.

As a certified personal trainer, I’ve successfully applied a step-by-step progression method for myself and my clients, helping us achieve the satisfying milestone of a chest-to-bar pull-up.

Determine the Starting Point

Don’t be discouraged if you can’t do one immediately because this is very common for beginners.

Your initial performance will determine the starting point of your training.

For instance, if you can’t hang from the bar for more than a few seconds, your focus should be on building grip strength and endurance.

If you can hang but struggle to pull yourself up, your training will concentrate more on developing back and arm strength.

Are your arms giving out quickly? Does your grip feel weak? Noting these details will help in customizing your training plan.

Trust me, you will notice the difference quite fast. What once was a struggle will be only a warm-up after a month of efficient training.

Let’s start.

Level 1: Bent Over Dumbbell Rows and Dead Hangs

Start with bent-over dumbbell rows to strengthen your back muscles.

Stand with feet shoulder-width apart, holding a dumbbell in each hand.

Bend your knees slightly and lean forward from your waist, keeping your back straight. Pull the dumbbells towards your chest, then lower them back down.

Make sure to rest at least 48 hours before repeating Level 1 Dumbbell Rows, which you can schedule for:

  • Monday
  • Wednesday
  • Friday

Once you’re able to complete 3 sets of 8 reps comfortably, it’s time to increase the weight of the dumbbell.

Start with a 25-pound (about 10kg) dumbbell. When you can handle that well, consider moving up to the next weight. If you’re a bit heavier, you might want to continue with this step until you lose some weight and gain more strength, perhaps even moving up to 35 or 40-pound (16 to 18kg) dumbbells.

Level 2: Inverted Bodyweight Rows and Scapular Pull-Ups

Inverted rows are a great way to work up to full pull-ups because you’re using a similar motion but not lifting your entire body weight.

You can make the exercise easier or harder by adjusting the setup.

Here’s a straightforward way to do an inverted row:

  • Set up a barbell around the height of your hips on a squat rack or a Smith machine.
  • Sit on the floor beneath the barbell with your knees bent and feet flat on the ground.
  • Reach up and grab the bar with both hands about shoulder-width apart, palms facing away from you.
  • Pull your shoulder blades back and down, and tighten your upper back.
  • Pull yourself up, aiming to get your chest close to the bar, focusing on using your back muscles rather than your arms.
  • Hold at the top for a couple of seconds, then lower yourself back down smoothly.
  • Make sure to set your shoulders before starting the next rep.

Here’s how to structure your workout schedule:

  • Monday: Do 3 sets of 8 reps of overhand bodyweight rows. Alternate between overhand and underhand grips during the sets.
  • Wednesday: Perform 3 sets of 8 reps of underhand bodyweight rows (with hands reversed). Switch between underhand and overhand grips throughout the session.
  • Friday: Again, do 3 sets of 8 reps of overhand bodyweight rows. The following week, alternate the starting grip—start with underhand, then overhand, and so on.

Once you’re able to do bodyweight rows with your body at a 45-degree angle or lower, you’re ready to move on to Level 3.

Level 3: Assisted Pull-Ups

I’m not a big fan of the assisted pull-up machine at the gym because it doesn’t quite replicate the full pull-up experience, though it’s definitely better than not practicing at all.

Here are some alternatives I recommend:

With a Chair

Using a chair can really help you achieve your first pull-up.

Place either one foot or both on the chair for support, but remember, they’re just there to assist.

Try to use your upper body as much as possible. You could also use a box or any similar-sized object to achieve the same effect.

With an Exercise Band

Exercise bands are fantastic for assisted pull-ups. They come in various strengths, or you can buy a variety pack to progress through different levels. Just place your foot in the band and pull yourself up.

With a Partner

Working out with a friend can be very helpful. Have them hold your feet and provide just enough assistance to complete each rep. Encourage them to gradually reduce their help as you get stronger.

How to Do an Assisted Pull-up:

  • Keep your abs tight and avoid swinging.
  • Pinch your shoulder blades together throughout the exercise.
  • Focus on using your arms to pull the bar down.
  • Use as little assistance as needed. Once you can handle pull-ups with both feet on the chair, try using just one foot.
  • If you’re using bands, consider having a few with different tensions so you can decrease the assistance as you improve.
  • Once you can do three sets of eight with assistance, you’re ready to move on to the next level.

Here’s a workout plan incorporating Level 3 pull-up exercises:

  • Monday: Do 3 sets of 8 reps of assisted pull-ups.
  • Wednesday: Perform 3 sets of 8 reps of inverted bodyweight rows.
  • Friday: Complete 3 sets of 8 reps of assisted chin-ups.

This routine will effectively prepare you for moving up to Level 4.

Level 4: Top Holds and Bar Hangs

Top holds involve holding yourself at the top of the pull-up position.

Bar hangs and Top Holds focuses on gripping the bar and hanging with your arms fully extended, building endurance in your grip and arms.

1) Top Hold

You should hold yourself in the top position of the chin-up or pull-up for about 5 to 10 seconds. It seems easier to maintain this hold in a chin-up position with my palms facing me. Start with some assistance using a box or bench under your feet to gradually put more weight on my arms until you can do it unassisted. If you only have a band, use that and try to progress to thinner bands, lifting feet up a little to reduce the assistance.

2) Bar Hang

This is straightforward. Grab the bar with your palms facing either towards or away from yourself; the latter usually feels a bit more comfortable. Starting with some assistance, try to shift more of your weight onto your hands until you can hang without any help.

  • Top Holds: Do these right after warming up at the start of my workout. Aim for 3 sets of about 5 seconds each, really focusing on engaging my muscles and shifting my weight onto my arms. Rest for 30 to 60 seconds between sets because it’s surprisingly exhausting!
  • Bar Hangs: Save these for the end of my workout, aiming to hang for 30 seconds to a minute in total. Start assisted and work towards doing this unassisted, in as few sets as possible, making it challenging each time.

Here’s what you can include in your Level 4 workout routine:

Monday:

  • Top Hold (Assisted or Unassisted): Try for 4 sets of 5 seconds each.
  • Assisted Pull-ups: Do 3 sets of 8 reps.
  • Bar Hang (Assisted or Unassisted): Aim for a total of 30 seconds.

Wednesday:

  • Top Hold (Assisted or Unassisted): Go for 4 sets, each lasting 5-10 seconds.
  • Bodyweight Rows: Complete 3 sets of 8 reps.
  • Bar Hang (Assisted or Unassisted): Total hang time should be between 30 to 60 seconds.

Friday:

  • Top Hold (Assisted or Unassisted): Again, 4 sets of 5 seconds.
  • Assisted Chin-ups: 3 sets of 8 reps.
  • Bar Hang (Assisted or Unassisted): Total of 30 seconds.

When you’re able to do the Top Holds and Bar Hangs without any assistance, you’re ready to tackle the next level!

Level 5: Negative Pull-Ups

We’re now really close to nailing that first pull-up!

The next big step is the negative pull-up, which focuses on the lowering phase:

  1. Stand under the pull-up bar and grab it with an overhand grip.
  2. Use a jump to bring your chest up to the bar.
  3. Lower yourself slowly and controlled back to the starting position.

NOTE: This exercise can be risky if you’re significantly overweight, so make sure you’ve built a solid foundation with previous exercises first.

For negative pull-ups, you have a couple of options:

  • Use a chair to help you get above the bar, then focus on lowering yourself down with control.
  • Jump from the ground to get your chest to the bar, then carefully lower yourself.

When lowering yourself, don’t go so slow that it wears you out completely.

Aiming for a controlled three-second count as you lower (“three Mississippi”) is a good pace.

This method will really help build your arm and back strength effectively.

Level 5 workout routine:

Monday:

  • Negative Pull-ups: Perform 4 sets of 1 rep each. Focus on a slow, controlled descent.
  • Assisted Pull-ups: Complete 3 sets of 8 reps.
  • Bar Hang (Unassisted): Aim for a total of 30 seconds.

Wednesday:

  • Top Hold (Unassisted): Do 4 sets, holding each for 5-10 seconds.
  • Bodyweight Rows: 3 sets of 8 reps.
  • Bar Hang (Unassisted): Try to hang for a total of 60 seconds.

Friday:

  • Negative Chin-ups: Again, 4 sets of 1 rep each, focusing on the lowering phase.
  • Assisted Chin-ups: 3 sets of 8 reps.
  • Bar Hang (Unassisted): Hold for a total of 30 seconds.

Once you’re managing all the negative reps easily across these exercises, you’ll be well-prepared to attempt a full pull-up.

Level 6: Attempting the First Full Pull-Up or Chin-Up

After mastering the previous levels, attempt your first full pull-up.

Start from a dead hang, engage your core, and pull yourself up until your chin is over the bar, then lower back down with control.

If you struggle, don’t be discouraged.

Continue practicing the negative pull-ups and assisted pull-ups to build more strength.

Level 7: Advanced Pull-Up Variations and Techniques

Once You can do 3 sets of 10 pull-ups or chin-ups, You have a few options to continue improving:

Option A: Keep increasing the number of reps—aim for 3 sets of 12, then 15, and maybe even 4 sets of 20.

Option B: Start trying different types of pull-ups. Here are some advanced variations:

  1. Wide Grip Pull-ups: By grabbing the bar much wider than usual, this variation increases the difficulty and really works the upper back.
  2. Side to Side Pull-ups: This involves shifting my weight from one arm to the other, adding an element of instability and focus on each side.
  3. Ring Pull-ups: Using gymnastic rings adds a dynamic challenge due to their movement.
  4. Towel Pull-ups: Great for improving grip strength by wrapping towels over the bar and holding onto them.

Option C: Add weight to pull-ups or chin-ups:

  1. Get a weight belt. I got mine from Amazon, and it’s been great. I’ve tried loading a backpack with weights, but it’s awkward. The weight belt is better because the weight hangs naturally between my legs.
  2. Start with small weights. Even if it feels silly, begin with something light like 2.5 lbs (about 1 kg) and gradually add more.
  3. Increase the weight progressively. I typically warm up with two sets of 5 unweighted pull-ups, then do 3 sets of 5 with the weighted belt. If I manage all reps, I’ll add a little more weight next time.

Latest Posts

Related Posts